
How to Draw A Police Officer. Many different groups in our society serve to protect us, and the police are one of the most important of these groups.
Also check our cute cat coloring pages.
These men and women serve daily to help those in need and have often put themselves in danger.
If you enjoy showing your gratitude for the police force, learning how to draw a police officer can be a great way!
At the end of the guide you are in, you can do just that and create your cop.
How to Draw A Police Officer
Step 1
In this first step of our guide on how to draw a police officer, you will draw the policeman’s head and cap.
Drawing a human head and face can be challenging, so try to replicate the lines we drew in our reference image as closely as possible.
The officer raises his head a little so that his neck is stretched with his face tilted.
Finally, once you’ve drawn his head, you can draw his police hat surrounding his head.
Step 2
We will complete your police officer drawing in this next part. First, you can use curved, pointed lines for the collar at the base of the neck.
Then you can draw a fairly straight line from the collar to the middle of the shirt. Once you’ve drawn that line, add a row of stitches below for the buttons on his shirt.
Finally, complete this step by drawing horizontal curved lines for her shoulders.
Step 3
There are many details that we are going to add in this step of our guide on how to draw a police officer, but don’t worry, we will do it slowly!
You can start by using curved and straight lines to draw the short sleeves of his shirt. Next, use some more curved lines to outline her chest.
Once you have the outlines for his chest, you can draw some square shapes for his shirt pockets.
Finally, finish this step by drawing details like his police badge and some details on his shoulders.
Step 4
Your cop drawing is cool so far! In this part, we continue to use curved constraints to draw her arms curved to the waist.
Once you’ve replicated the arms as they appear in the reference image, you can pull his belt, which will attach things like a radio and a pouch.
Step 5
The top half of the drawing is almost complete now, so in this step of our guide to drawing a police officer, let’s start with the bottom half.
We will draw the legs themselves with some slightly curved lines, and we will add some more details to their waistband as well.
These consist mainly of a pair of handcuffs hanging from your belt and a police baton at your side. Now that we’ve added all those details, we can move on to some final details.
Step 6
In this step, we can finish the legs for your police officer design.
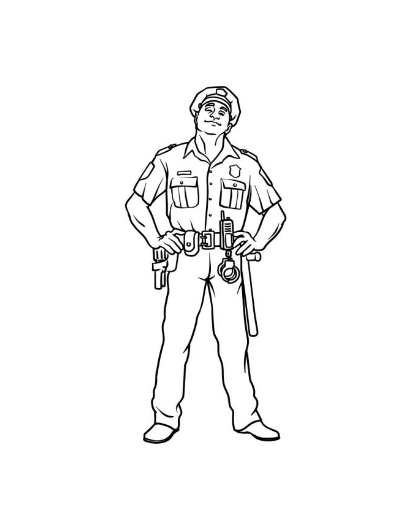
To do this, extend down the lines you started for her legs, and then we will round her shoes at the base.
Once you’ve added all those details, you’re done with the image! Before you color it for the next step, you can add details and elements to finish it.
You could tweak some of the smaller details or even use what you learned to create a unique cop.
You could also search for police car images and draw one in the background for that officer.
Step 7
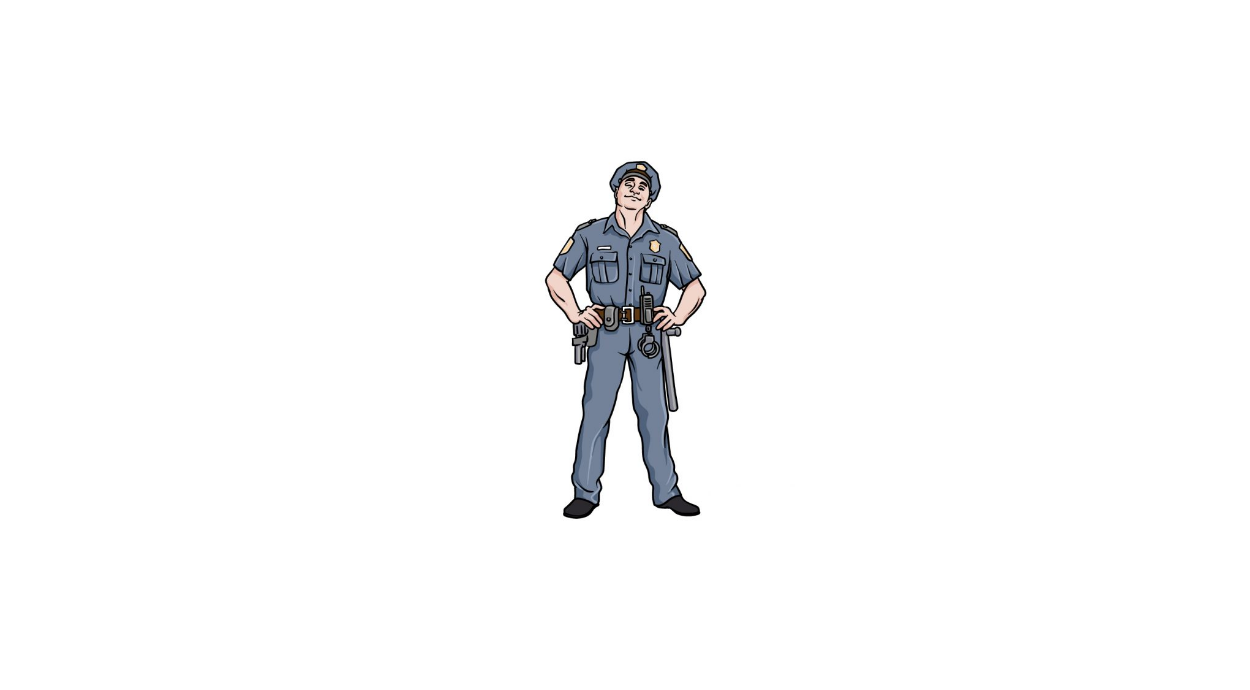
You’ve completed the last step of our guide on how to draw a police officer, and here’s a little color to bring your artwork to life!
A police officer’s uniform is often a darker blue color, and that’s exactly what we chose in our example image.
However, there are a few variations that a police officer’s uniform can come in, giving you a few options on how to go about it.
You can also play around with different artistic mediums depending on what kind of colors you want in your photo.
For more muted tones, watercolor or colored pencils work best, while acrylics and colored pencils are great for lighter colors.
Your Police Officer Drawing is Finished!