
How To Draw Gatha Life. Developed in 2018, Gacha Life is a video game that allows players to create and customize their characters in an anime style. Players can fully customize their characters, from the shape of their eyes and hairstyle to the clothes and shoes they wear. The extreme favor of this game has made a huge demand for a free Gacha Life picture tutorial. To fulfill your wishes, we have created a step-by-step tutorial on how to draw Gacha Life, summarized in 9 quick and easy steps.
The fun thing about this tutorial is that, just like in the actual video game, you can even make the character look like an animated version of you by drawing your distinctive physical features! It’s like playing Gacha Life, but on a sheet of paper! Have fun, and use your artistic skills! You can draw many more characters like batman drawing, Anubis drawing, cat drawing, cobra drawing, blueberry drawing, coconut drawing and many more drawing for kids.
Step 1:
Start by removing a square shape with curved borders to form your personality’s head. Next, draw a semicircle attached to the right side of the head to create the ear. As the character is slight to the side, only one ear is visible. Make sure the head is drawn just above the middle of the paper. This guarantees that there is sufficient room for your character’s full body.
Step 2:
Draw two short curved lines below the head with a small space between them to create your character’s neck. Next, continue by drawing the shirt your character is wearing.
Step 3:
Draw a vertical line on the left side under the shirt. Then remove a shorter perpendicular line parallel to it. Next, draw a horizontal line at the bottom, connecting the two ends of the vertical lines. This creates the left pant leg that your character wears.
Step 4:
Repeat the earlier step on the opposing side to finish the pants. At this point, your character should be fully dressed; all that is missing is a pair of shoes to match the outfit! We held the outfit, as you can visit in the pictures. However, feel free to draw the clothes you like. After all, he is your very own Gacha Life character!
Step 5:
Draw a bent shape at the base of each leg to make the shoes. As you can see in the illustration, both feet are facing left because the character is facing that direction. Keep this in mind to avoid inaccuracies! Similar to your character’s clothing, you can customize your character’s shoes.
Step 6:
Draw a long, narrow shape under the sleeve of each shirt to create the character’s two arms. Create a different curve at the base of both arms to make the thumb!
Step 7:
Resume by drawing your nature’s hairline, which should be beyond the forehead. Next, outline the hair that wraps around your character’s entire head. You can also customize the hair! You can draw short hair, long curly hair, or any hair you like. You can also put your hair in a ponytail, a braid, or a cute bun. This will make your character more unique!
Step 8:
Now that we’ve finished drawing your character’s head and body, it’s time to complete the look by drawing your facial features. Continue drawing two curved lines near the forehead to form the arched eyebrows. Then draw a small upward curve to put a smile on your character’s face.
Step 9:
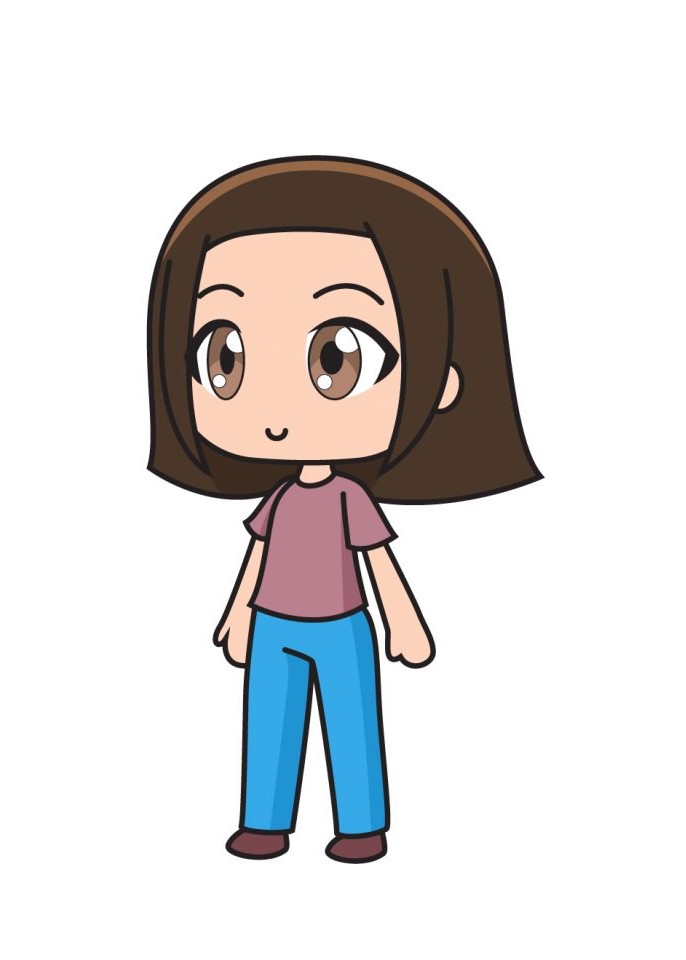
Moving on to the eyes, draw two huge oval shapes under each eyebrow to form the pupils. Then circle the shape with a diagonal line on each oval shape to create the upper lid of your character’s eyes. Next, draw three more shapes inside the pupil: A vertical oval in the middle. A small circle at the bottom left A semicircle in the upper right corner Now shade the entire oval shape we drew inside the pupil to excite the eyes! It’s finally time for the long-awaited game! If you find that drawing your character, coloring is much more enjoyable.
This is where you can show off your artistic skills and ability to mix and match colors. Which colors you choose for your character is up to you! But here’s a helpful tip: To create a skin color, combine white, yellow, blue, and red. Depending on the face you are trying to accomplish, you may need to count more than one specific color. Keep in mind that skin colors are best achieved when using coloring materials that are fairly easy to blend, such as watercolor or paint.