
In today’s digital age, video tutorials have become an essential tool for sharing knowledge and engaging audiences. If you’re looking to crear un vídeo tutorial that captivate your viewers, you’ve come to the right place. In this comprehensive guide, we will walk you through the process of creating professional video tutorials using the powerful iTop Screen Recorder. By following these steps, you’ll be able to produce compelling tutorials that will help you stand out from the crowd.
Step 1: Download and Install iTop Screen Recorder
The first step towards creating outstanding video tutorials is to download and install el grabador de pantalla iTop. To do this, follow these simple instructions:
- Visit the official website of iTop Screen Recorder.
- Locate the download link for the software.
- Click on the download link to initiate the download.
- Once the download is complete, open the downloaded file.
- Follow the on-screen instructions to install iTop Screen Recorder on your computer.
Step 2: Select Recording Options
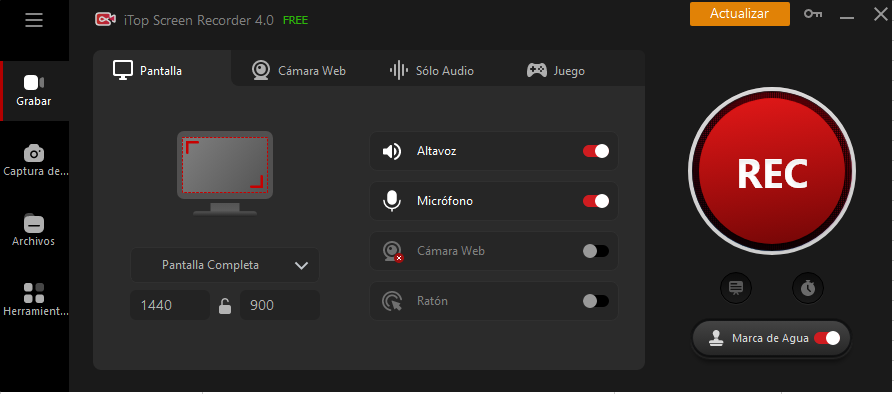
After installing the iTop Screen Recorder, it’s time to choose the recording options that best suit your needs. iTop Screen Recorder provides three recording options:
- Full Screen: Capture the entire screen of your computer.
- Specific Window: Record a specific application window.
- Custom Region: Select a custom area on your screen to record.
Select the recording option that is most appropriate for your tutorial and proceed to the next step.
Step 3: Configure Audio Settings
To ensure that your video tutorial has high-quality audio, it’s important to configure the audio settings in iTop Screen Recorder. You have three options for audio recording:
- System Sound: Capture the audio playing on your computer.
- Microphone: Record audio using an external microphone.
- Both: Capture both system sound and microphone audio simultaneously.
Choose the audio recording option that best suits your tutorial requirements and proceed to the next step.
Step 4: Record Your Webcam
If your tutorial requires webcam footage, iTop Screen Recorder allows you to easily record your webcam along with the screen recording. Follow these steps to record your webcam:
- In the main interface of iTop Screen Recorder, click on the “Webcam” button to enable webcam recording.
- Adjust the webcam recording window size and position according to your preference.
- Press the “Record” button to start recording your screen and webcam simultaneously.
Step 5: Start Recording
Now it’s time to start recording your tutorial. Follow these steps to begin the recording:
- If you have chosen the “Full Screen” or “Specific Window” recording option, click on the “REC” button, the recording will start immediately.
- If you have selected the “Custom Region” option, click and drag your mouse to select the desired area on your screen, and then click the “REC” button.
Step 6: Stop and Save the Recording
Once you have finished recording your tutorial, it’s important to stop the recording and save the file. Just cllick on the “Stop” button in iTop Screen Recorder.
Step 7: Edit Your Video Tutorial
To enhance the visual appeal of your video tutorial, iTop Screen Recorder provides a built-in video editor. Follow these steps to edit your tutorial:
- Open the built-in video editor in iTop Screen Recorder.
- Trim your tutorial to remove any unwanted parts.
- Add text or effects to emphasize key points in your tutorial.
- Export your edited tutorial in your preferred format.
Once your video tutorial is complete, it’s time to share it with your audience. Consider these platforms and methods for sharing your tutorial:
- Upload the tutorial to popular video hosting platforms like YouTube or Vimeo.
- Embed the tutorial on your website or blog.
- Share the tutorial on social media platforms to reach a wider audience.
By following these steps and utilizing the powerful features of iTop Screen Recorder, you can create professional video tutorials that will engage your audience and help you establish yourself as an authority in your field.
Conclusion
Creating a video tutorial with iTop Screen Recorder is a straightforward process that can yield professional-grade results. By following the steps outlined in this guide, you’ll be able to produce engaging and informative tutorials that will captivate your audience. Remember to download and install iTop Screen Recorder, select the appropriate recording options, configure audio settings, record your webcam if needed, start and stop the recording, edit the tutorial using the built-in video editor, and finally, share your tutorial with the world. With iTop Screen Recorder, you have the power to create outstanding video tutorials that will outrank your competitors and establish your online presence.
So, why wait? Start creating remarkable video tutorials with iTop Screen Recorder today and make a lasting impression on your audience!